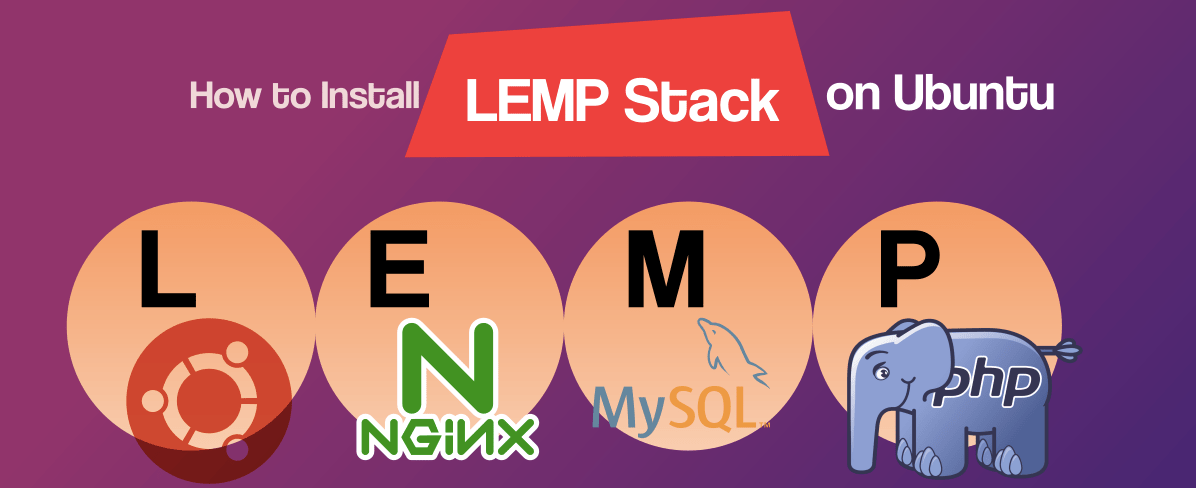
How to install the LEMP stack (Linux, Nginx, MySQL, PHP) on Ubuntu 20.04
The LEMP stack, particularly for Linux, Nginx, MySQL, and PHP, is a category of tools that are used in supporting complex web sites and web applications written in PHP. The backend data is processed in the MySQL database and the complex analysis is done mostly by PHP programming language.
With that being said, this blogpost will be presented as a tutorial that would teach you how to install the LEMP stack on Ubuntu version 20.04 system. We will go into how to set up the rest of the elements before we get underway. In order to put this tutorial into action, you will need a connection to a non-root sudo user on the Ubuntu Virtual Private Server with a firewall activated. After following our initial server configuration step-wide tutorial for Ubuntu 20.04, you would be able to launch all your operations.
With that being said and done, we can now proceed with this blogpost. Without further ado, you should dive straight into the six steps in which you can conveniently install the LEMP stack on Ubuntu 20.04.
Step 1:
We are going to be using Nginx, the best web server on the web, for this blog. We can use the apt package manager to download this program. As this is your first time employing the ‘apt’ for this session, commence by installing your server’s package index. Following that, you can use the below mentioned commands to install nginx.
‘sudo apt update’
‘sudo apt install nginx’
After it asks for a confirmation, type Y to indicate approval for installation. It is advisable to activate the most restricting profile which will enable traffic that you will need. Because you haven’t setup SSL for your domain, you only need to support unclassified HTTP transmission on port 80. Type the following commands:
Sudo ufw allow ‘Nginx HTTP’
Sudo ufw status
When you see a web page saying “Welcome to Nginx”, then it implies that you have succeeding in your task at installing it perfectly.
Step 2:
One of the next moves is to create a MySQL database server and be able to process and handle data for your website. MySQL is a common framework that allows PHP to handle databases.
Firstly, use ‘apt’ to get this software up and running.
Sudo apt install myself-server
For approval, type Y to indicate Yes. You could consider running a protection script that came pre-installed with MySQL. This script will purge all default settings and protect your database framework. Launch the interactive script by starting this instruction.
Sudo mysql_secure_installation
After that, confide the VALIDATE PASSWORD PLUGIN. Keep answering Y to indicate Yes and press Enter Key to proceed. You will secure yourself from SQL injection bugs and hackers will no longer exploit the servers with remote root login. When you’re done with the task, verify if you can log in to MySQL console by using:
Sudo mysql
mysql> quit
Step 3:
PHP may be used to execute code and can create interactive material for the webserver.
Nginx doesn’t let Apache install PHP; instead, it allows an external application to manage PHP processing and function as a connection between PHP and the site server. This functionality makes for higher overall output in certain PHP-based websites, but it needs a configuration adjustment. You must install and configure PHP-FPM, a PHP process manager, and configure Nginx to route PHP requests via this program. Furthermore, you’ll want PHP-MySQL which enables PHP to interact with MySql-based databases. Key PHP modules would be built automatically.
In order to install the PHP-FPM packages, you need to type the following command:
sudo apt install php-frm php-mysql
Each of the LEMP stack modules has been activated so far. Next, Nginx needs to be configured to lead requests to the PHP process. Nginx is configured by running commands inside server blocks. Hostnets are identical to Apache’s virtual hosts.
Step 4:
When utilizing the Nginx web server, we can build servers that are built using distinct server blocks (closely related to virtual hosts in Apache). However, each server block can have an entirely different layout than the other server blocks. In this guide, we’ll be referring to your domain as a sample domain name.
Using Ubuntu 20.04, Nginx is immediately set up with one server block allowed by default that is set up for serving files out of a directory at /var/www/html. Since this helps one site to handle well, it can be challenging to manage when hosting several sites, particularly on shared hosting providers. Instead of updating /var/www/html, we rather maintain configuration files for the domain website in the /var/www/html and leave the default website as the current directory to be handled for any queries that do not fit any other established pages.
Proceeding with this, you should type in the following commands:
sudo mkdir /var/www/your_domain
sudo chown –R $USER:$USER /var/www/your_domain
Sudo nano /etc/nginx/sites-available/your_domain
Go ahead and allow your setup by connecting to the configuration file from Nginx’s sites-enabled directory.
sudo ln -s /etc/nginx/sites-available/your_domain /etc/nginx/sites-enabled/
sudo nginx –t
sudo systemctl reload nginx
nano /var/www/your_domain/index.html
You need to go to a browser and get access to the server’s domain name or the IP address.
https:// server_domain_or_IP
After which you will see a web page saying “Hello Word!”
Since you’re using a temporary file as a landing site for your application, you should keep this file in position as a temporary launch site for your application. Once you have imported the index.html file into the document root, be sure to delete or rename the index.html file from file root, since it will take priority over an index.php file by default.
The LEMP stack is tailored to its maximum potential. For the current setup, we can write a PHP script that will take a randomly created filename and verify that Nginx is still able to manage .php files inside the configured website.
Step 5:
The entirety of your LEMP stack will now be lined up correctly. You can take the search on that which confirms that Nginx properly serves your .php files when you run the test.
You will evaluate your PHP file in your document root by running the command into your command line. Create a new file named info.php inside the document root in the text editor, then open it and type:
nano /var/www/your_domain/info.php
When you are through with your commands, be sure to save and exit the file by clicking CTRL+X and then ENTER for approval.
You will now reach the page in the internet browser by accessing the domain or default IP address you’ve configured in your Nginx setup file. After that, it’s /info.php that you want to use in your internet browser.
https:// server_domain_or_IP/ info.php
After you have identified the connection for the related details regarding your PHP server from that site, it is safest to delete the file you have generated as it contains confidential data about the PHP environment as well as your Ubuntu server.
sudo rm /var/www/your_domain/info.php
Step 6:
In case, you want to evaluate PHP and see if it will link to MySQL and perform database queries, you can first build a prototype containing dummy data and then supply the data to a script written in one of the programming languages. First, we would need to build a test data set and a new MySQL user in the framework and then properly configure this new user to access everything.
Only at beginning of the thread, the local MySQL PHP library does not accept the caching sha2 authentication, the standard authentication mechanism for MySQL 8. You’ll need to build a new user using the MySQL native password authentication mechanism required to be allowed to link to our MySQL database from our PHP script. Because databases and users are stuff generally with us, we can build a database called “example database”, and a user named “example user” to keep things clear.
After connecting to MySQL from the root account, use commands:
sudo mysql
mysql> CREATE DATABASE example_database
mysql> CREATE USER ‘example_user’@’%’ IDENTIFIED WITH mysql_native_password BY ‘password’;
mysql> GRANT ALL ON example_database.* TO ‘example_user’@’%’;
mysql> exit
Log in to MySQL again by using the user credentials:
mysql -u example_user –p
mysql> SHOW DATABASES;
mysql> INSERT INTO example_database.todo_list (content) VALUES (“My first important item”);
mysql> SELECT * FROM example_database.todo_list;
mysql> exit
In your web browser, try opening this web page using the URL:
https:// server_domain_or_IP/ todo_list.php
Final Verdict
Your diligent work and commitment have paid off. We have effectively installed the LEMP stack on the Ubuntu 20.04 KVM VPS. In this tutorial, we’ve created a scalable platform for supporting PHP websites and applications to your visitors, utilizing Nginx as the primary web server and MySQL as the reliable database system. You can commence deploying websites and apps in your latest LEMP network stack. If you have a website, web app, or server-side logic designed on a smartphone application, you can conveniently host it.